Thursday, January 4, 2024

Issue in Lightning-progress-indicator in lwc

 Hello all today i will share one inserting issue, when we used conditional rendering within  

Lightning-progress-indicator


ProgressIndicatorBasic.html

<template>

    <p>

        A progress indicator displays the steps in a process. All steps preceding the step specified by currentStep are marked completed.

    </p>

    <lightning-progress-indicator current-step="3" type="base" has-error="true" variant="base">

        <lightning-progress-step label="Step 1" value="1"></lightning-progress-step>

     <template if:true={areDetailsVisible}>

            <lightning-progress-step label="Step 2" value="2"></lightning-progress-step>

        </template>

        <lightning-progress-step label="Step 3" value="3"></lightning-progress-step>

        <lightning-progress-step label="Step 4" value="4"></lightning-progress-step>

    </lightning-progress-indicator>

</template>

ProgressIndicatorBasic.js

import { LightningElement } from 'lwc';


export default class ProgressIndicatorBasic extends LightningElement {}


Issue: As per the above code if  <template if:true={areDetailsVisible}> is true then Lightning-progress-indicator step will

correctly otherwise current steps selection will display correctly.

Updated code:-

<template>

    <p>

        A progress indicator displays the steps in a process. All steps preceding the step specified by currentStep are marked completed.

    </p>

   <template if:true={areDetailsVisible}>

<lightning-progress-indicator current-step="3" type="base" has-error="true" variant="base">

        <lightning-progress-step label="Step 1" value="1"></lightning-progress-step>

        <lightning-progress-step label="Step 2" value="2"></lightning-progress-step>

        <lightning-progress-step label="Step 3" value="3"></lightning-progress-step>

        <lightning-progress-step label="Step 4" value="4"></lightning-progress-step>

    </lightning-progress-indicator>

<template>

<template if:false={areDetailsVisible}>

<lightning-progress-indicator current-step="3" type="base" has-error="true" variant="base">

        <lightning-progress-step label="Step 1" value="1"></lightning-progress-step>

       <lightning-progress-step label="Step 3" value="3"></lightning-progress-step>

        <lightning-progress-step label="Step 4" value="4"></lightning-progress-step>

    </lightning-progress-indicator>

<template>


</template>


Lightning-progress-indicator in lwc

 A lightning-progress-indicator component displays steps horizontally. It indicates the number of steps in a given process, the current step, as well as prior steps which is completed.

Steps are created using lightning-progress-step component along with label and value attributes. The current step is specified using the current-step attribute, The current step must match one of the value attributes on a lightning-progress-step component as shown below.

  • Set type="base" to create a component that implements the progress indicator blueprint in the Lightning Design System. 

          A progress indicator component communicates to the user the progress of a particular process.
     

  • Set type="path" to create a component that implements the path blueprint in the Lightning Design System. 
          The Path communicates to the user the progress of a particular process.

  • If the type is not specified, the default type base is used. 

lightningprogressindicator.html

<template>
    <p>
        A progress indicator displays the steps in a process. All steps preceding the step specified by currentStep are marked completed.
    </p>
    <lightning-progress-indicator current-step="3" type="base" has-error="true" variant="base">
        <lightning-progress-step label="Step 1" value="1"></lightning-progress-step>
        <lightning-progress-step label="Step 2" value="2"></lightning-progress-step>
        <lightning-progress-step label="Step 3" value="3"></lightning-progress-step>
        <lightning-progress-step label="Step 4" value="4"></lightning-progress-step>
    </lightning-progress-indicator>
</template>

lightningprogressindicator.js

import { LightningElement } from 'lwc';

export default class lightningprogressindicator extends LightningElement {}

Tuesday, January 2, 2024

How to use Salesforce Authenticator for MFA


Salesforce Authenticator is an intelligent, mobile-enabled two-factor authentication app that adds an extra layer of security to protect the Salesforce account and data.


  1. PHONE: Download Salesforce Authenticator from the App Store or Google Play on your mobile device.
    AuthenticatorApp.png
  2. DESKTOP: Login to Specright. Click the person icon in the upper right corner, then click Settings. Select Advanced User Details in the My Personal Information section on the left hand side
    1. No results? Enter Personal Information in the Quick Find box, then select Personal Information.
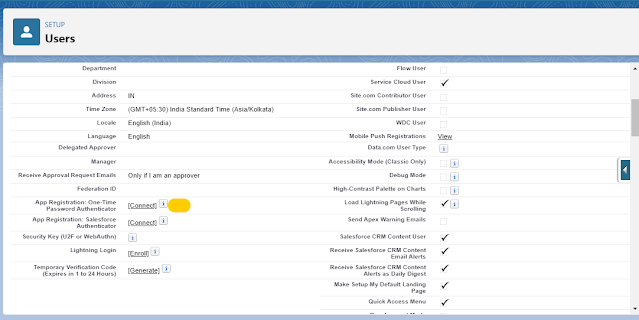
  3. DESKTOP: Find App Registration: Salesforce Authenticator, and click Connect


  4. PHONE: Open the Salesforce Authenticator app on your mobile device. If you’re opening the app for the first time, you see a tour of the app’s features. Take the tour, or go straight to adding your Specright account to the app.
  5. PHONE: In the app, tap Add an Account to add your account. The app generates a unique two-word phrase.

  6. Phone_1.gif
  7. DESKTOP: Back in your browser, enter the phrase in the Two-Word Phrase field. Then click Connect.

Note: If you previously connected an authenticator app that generates verification codes to your account, you sometimes see an alert. Connecting a new version of the Salesforce Authenticator mobile app invalidates the codes from your old app. When you need a verification code, get it from Salesforce Authenticator from now on.

Specright Settings_2.gif

  1. PHONE: In the Salesforce Authenticator app on your mobile device, you see details about the account you’re connecting. To complete the account connection, tap Connect in the app.
    Phone_2.gif