Showing posts with label Salesforce. Show all posts

Wednesday, June 15, 2022

How to Make Lightning Experience the Only Experience for Some Users

 Ready for some of your users to go all-in on Lightning Experience? Keep them in the new interface by removing the option to switch back to Salesforce Classic.

When you enable Lightning Experience, users with the Lightning Experience User permission automatically get the Switcher. The Switcher lets users move back and forth between the new and classic Salesforce interfaces. But you can remove the Switcher for designated users.

From Setup, create a permission set that includes the Hide Option to Switch to Salesforce Classic permission then assign the permission set to the desired users. Or, enable the permission in a custom profile to remove the Switcher from everyone in that profile.

Hide Option to Switch to Salesforce Classic permission in profiles and permission sets

Users see Lightning Experience the next time they log in to Salesforce. They no longer see the Switch to Salesforce Classic link.

Even if the Hide Option to Switch to Salesforce Classic permission set is assigned, admins with the Customize Application or Modify All Data user permission can use the Switcher to get to Salesforce Classic.

How to Turn Off Salesforce Classic for Your Org

 Hi all today we are going to disscuss , how to Turn Off Salesforce Classic for Your Org.When all your users are working in Lightning Experience and everyone has the features we need to stop supporting two interfaces—by turning off your org’s access to Salesforce Classic


Turn off your org’s access to Salesforce Classic by removing the Switcher for all users.

  1. From Setup in Lightning Experience, enter Lightning in the Quick Find box, then select Lightning Experience Transition Assistant.
  2. Select the Optimize phase.
  3. Click Turn Off Salesforce Classic for Your Org to expand the stage.
  4. Turn on Make Lightning Experience your org’s only experience.

Users see Lightning Experience the next time they log in to Salesforce. They no longer see the Switch to Salesforce Classic link.

Important
IMPORTANT Restoring Salesforce Classic access for specific users after removing the Switcher from your org isn’t possible. If you want to turn off Salesforce Classic access for most but not all users, use the Hide Option to Switch to Salesforce Classic permission instead.

Monday, May 30, 2022

Difference between SObject and Platform Events


Difference between SObject and Platform Events

SObjects__cPlatform_Events__e
DMLs (Insert, Update, Delete)Publish (Insert only)
SOQLStreaming API
TriggersSubscribers
Parallel context executionGuaranteed order of execution

Considerations :-

  1. Platform event is appended with__e suffix for API name of the event.
  2. You can not query Platform events through SOQL or SOSL.
  3. You can not use Platform in reports, list views, and search. Platform events don’t have an associated tab
  4. Published platform events can’t be rolled back.
  5. All platform event fields are read-only by default
  6. Only after insert Triggers Are Supported
  7. You can access platform events both through API and declaratively
  8. You can control platform events though Profiles and permissions

Summary

Platform events simplify the process of communicating changes and responding to events. Platform events can be used to Overcome Salesforce Governor Limits.

What is Plateform Event In Salesforce and How to Use it

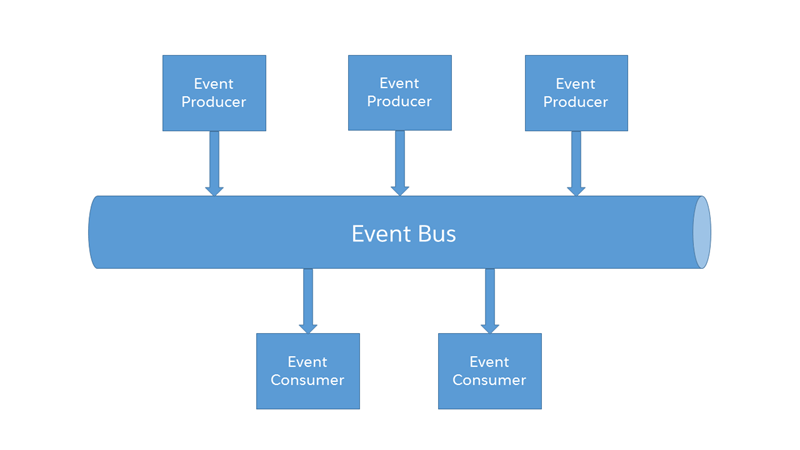
Salesforce event-driven architecture is consisting of

  • event producers
  • event consumers
  • channels. 

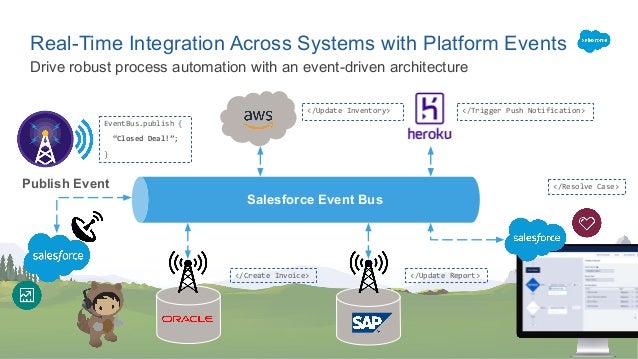
Platform events simplify the process of communicating changes and responding to events. Publishers and subscribers communicate with each other through events. One or more subscribers can listen to the same event and carry out actions.

With an Event-driven architecture each service publishes an event whenever it updates or creates a data. Other services can subscribe to events. It enables an application to maintain data consistency across multiple services without using distributed transactions. 

TrailheaDX 2019 : Explore New Frontiers with High Volume Platform Ev…

Let us take an example of order management. When the Order management app creates an Order in a pending state and publishes an Order Created event. The Customer Service receives the event and attempts to process an Order. It then publishes an Order Update event. Then Order Update Service receives the event from the changes the state of the order to either approved or canceled or fulfilled. The following  diagram show the event driven architect

An Introduction to Salesforce Platform Events - SFDC Beginner

Terminology

Advertisements
REPORT THIS AD

Event

A change in state that is meaningful in a business process. For example, a placement  of an order is a meaningful event because the order fulfillment center requires notification to process the order.

Event Notifier

A message that contains data about the event. Also known as an event notification.

Event producer

The publisher of an event message over a channel.

Channel

A conduit in which an event producer transmits a message. Event consumers subscribe to the channel to receive messages.

Event consumer

A subscriber to a channel that receives messages from the channel. A change in state that is meaningful in a business process.

But when you overlook at Platform events it makes similar to Streaming API and most of the futures including the replayID and durability but below makes the difference between with streaming API.

  • Platform  events are special kinds of entity similar to custom object
  • You can publish and consume platform events by using Apex or a REST API or SOAP API.
  • Platform events integrate with the Salesforce platform through Apex triggers. Triggers are the event consumers on the Salesforce platform that listen to event messages.
  •  Unlike custom objects, you can’t update or delete event records. You also can’t view event records in the Salesforce user interface, and platform events don’t have page layouts. When you delete a platform event definition, it’s permanently deleted.
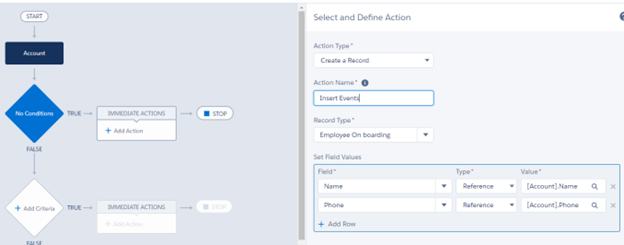
  • Platform events may be published using declarative tools (Process Builder)
  • platform events can also be subscribed to using APEX  or decoratively process builder      and flows

Publishing and subscribing Platform events

Publishing and subscribing the platform event are more flexible. You can publish event messages from a Force.com app or an external app using Apex or Salesforce APIs and you can subscribe from the Salesforce or external apps or use long polling with cometD as well.

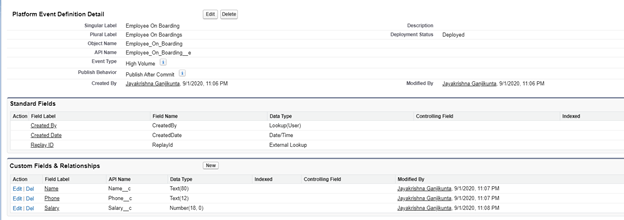
Define Plat form Event

Define platform event similar like custom object, go to setup –> develope –> Platform events –> create new platform events as shown below.

Publish Platform events

1.a. Publish Using Apex

A trigger processes platform event notification sequentially in the order they’re received and trigger runs in its own process asynchronously and isn’t part of the transaction that published the event. Salesforce has a special class to publish the platform events EventBus which is having methods publish method. once the event is published you can consume the events from the channel

trigger PlatformEventPublish on Account (after insert , after update ) {
    
    If(trigger.isAfter && trigger.isUpdate){
        List<Employee_On_boarding__e> publishEvents = new List<Employee_On_boarding__e>();
        for(Account a : Trigger.new){
            Employee_On_boarding__e eve = new Employee_On_boarding__e();
            eve.Name__c = a.Name ;
            eve.Phone__c = a.Phone ;
            eve.Salary__c = a.AnnualRevenue ;
            publishEvents.add(eve);            
        }
        if(publishEvents.size()>0){
            EventBus.publish(publishEvents);
        }
        
    }
    
}

1.b. Publish Using Process Builder

1.c. Publish Events by Flow

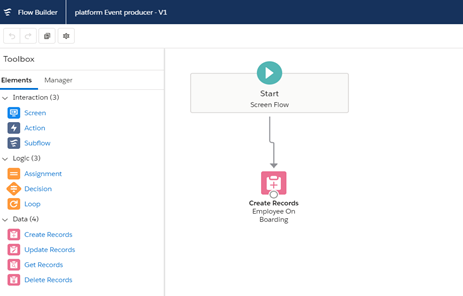
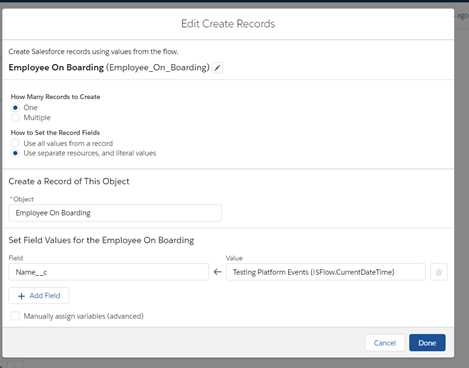
Create flow: 1(platform Event producer)

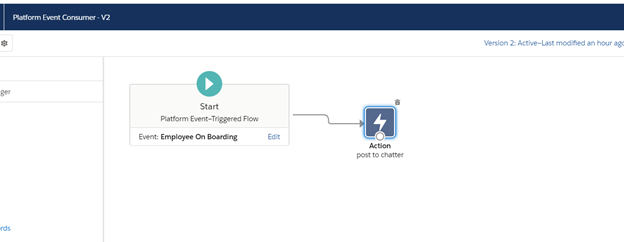
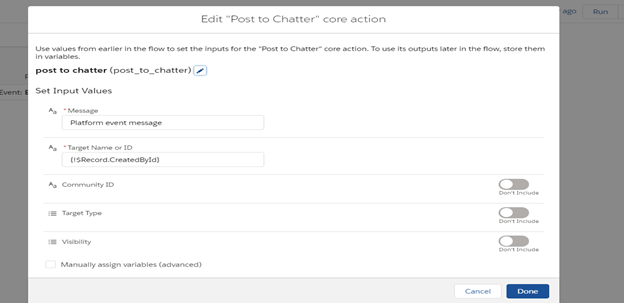
Create flow:2(Platform Event Consumer)

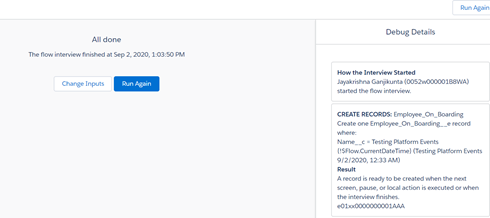
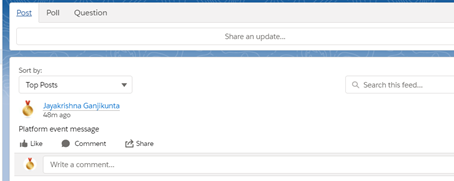
Run/Debug Flow:1(platform Event producer) and you will send post in chatter.

Result:

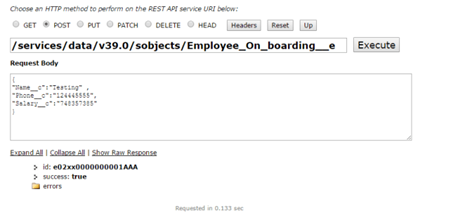
1.d. Publish Events by Using API (Using workbench)

Subscribe for Platform events

We can subscribe to the platform events from the Platform events object trigger which is created in step 1. Here is the sample trigger show how you can handle the subscribed events. create new accounts from the platform event but you can implement your own business logic to update the data.

Using Trigger:

trigger OnBoardingTrigger on Employee_On_boarding__e (after insert) {
    List<Account> acc = new List<Account>();
    for(Employee_On_boarding__e oBording :trigger.new){
        acc.add(new Account(Name =oBording.Name__c , Phone =oBording.Phone__c , AnnualRevenue = oBording.Salary__c));
    }
    if(acc.size() >0){
        insert acc ;
    }
}

Below is simple visual force page that consumes the platform events which you published. This page is built on cometD.

CometD is a set of library to write web applications that perform messaging over the web.Whenever you need to write applications where clients need to react to server-side events, then CometD is a very good choice. Think chat applications, online games, monitoring consoles, collaboration tools, stock trading, etc. 

you can consume the platform events by using this  URI /event/Employee_On_boarding__e and the Complete code is here below.

<apex:page standardStylesheets="false" showHeader="false" sidebar="false">
    <div id="content"> 
    </div>
    <apex:includeScript value="{!$Resource.cometd}"/>
    <apex:includeScript value="{!$Resource.jquery}"/>
    <apex:includeScript value="{!$Resource.json2}"/>
    <apex:includeScript value="{!$Resource.jquery_cometd}"/>
   
    <script type="text/javascript">
    (function($){
        $(document).ready(function() {
            $.cometd.configure({
                url: window.location.protocol+'//'+window.location.hostname+ (null != window.location.port ? (':'+window.location.port) : '') +'/cometd/40.0/',
                requestHeaders: { Authorization: 'OAuth {!$Api.Session_ID}'}
            });
            $.cometd.handshake();
            $.cometd.addListener('/meta/handshake', function(message) {
                $.cometd.subscribe('/event/Employee_On_boarding__e', function(message) {
                    var div = document.getElementById('content');
                                    div.innerHTML = div.innerHTML + '<p>Notification </p><br/>' +
                        'Streaming Message ' + JSON.stringify(message) + '</p><br>';
                });
            })
        });
    })(jQuery)
    </script>
</apex:page>

Monday, December 23, 2013

MIXED_DML_OPERATION error in Salesforce.com

MIXED_DML_OPERATION,
 DML operations on certain sObjects can’t be mixed with other sObjects in the same transaction. This is because some sObjects affect the user’s access to records in the organization.
 These types of sObjects must be inserted or updated in a different transaction to prevent operations from happening with incorrect access level permissions. For example, you can’t update an account and a user role in a single transaction. However, there are no restrictions on delete DML operations.
 DML operation on setup object is not permitted after you have updated a non-setup object (or vice versa): User, original object: Account
 http://www.salesforce.com/us/developer/docs/apexcode/Content/apex_dml_non_mix_sobjects.htm

 Salesforce categorizes objects into so called setup and non-setup objects. User is a setup object while Contact is a non-setup object. Salesforce restricts DML operations so that both kinds of objects can't be manipulated in the same context.
 If you need to change User's IsActive field, add a custom IsActiveProxy field to the user and perform your update in a trigger on it: trigger
UpdateContactTrigger on Contact (after update)
{
 User u = [SELECT Id, IsActive FROM User WHERE IsActive = true];
 u.IsActiveProxy__c = false;
 update u;
 }
Then create a 'before update' trigger on a User that copies the proxy field value to the standard field:
 trigger BeforeUpdateUserTrigger on User (before update)
 {
 for(User user : trigger.new)
 {
 if(user.IsActive != user.IsActiveProxy__c)
 { user.IsActive = user.IsActiveProxy__c;
 }
 }
 }
 define @future method which will do the update and call this method from trigger.
 @future
 updateUser()
{
 User u = [SELECT Id, IsActive FROM User WHERE IsActive = true];
 u.IsActive = false;
 update u;
 }
 and call it in
trigger: trigger UpdateContactTrigger on Contact (after update)
{
 updateUser();
 }

Friday, May 6, 2011

Inbound email service for Salesforce.com

Email Service is way by which we can create/write inbound message in salesforce.

Email services are automated processes that use Apex classes to process the contents, headers, and attachments of inbound email. For example, you can create an email service that automatically creates contact records based on contact information in messages.

We can associate each email service with one or more Salesforce-generated email addresses to which users can send messages for processing. To give multiple users access to a single email service, you can:
■Associate multiple Salesforce-generated email addresses with the email service and allocate those addresses to users.
■Associate a single Salesforce-generated email address with the email service, and write an Apex class that executes according to the user accessing the email service. For example, you can write an Apex class that identifies the user based on the user's email address and creates records on behalf of that user.
To use email services, click Your Name | Setup | Develop | Email Services.
■Click New Email Service to define a new email service.
■Select an existing email service to view its configuration, activate or deactivate it, and view or specify addresses for that email service.
■Click Edit to make changes to an existing email service.
■Click Delete to delete an email service.
Note
Before deleting email services, you must delete all associated email service addresses. When defining email services, note the following:
■An email service only processes messages it receives at one of its addresses.
■Salesforce limits the total number of messages that all email services combined, including On-Demand Email-to-Case, can process daily. Messages that exceed this limit are bounced, discarded, or queued for processing the next day, depending on how you configure the failure response settings for each email service. Salesforce calculates the limit by multiplying the number of user licenses by 1,000. For example, if you have ten licenses, your organization can process up to 10,000 email messages a day.
■Email service addresses that you create in your sandbox cannot be copied to your production organization.
■For each email service, you can tell Salesforce to send error email messages to a specified address instead of the sender's email address.
■Email services rejects email messages and notifies the sender if the email (combined body text, body HTML and attachments) exceeds approximately 10 MB (varies depending on language and character set).

More link
http://blog.jeffdouglas.com/2010/03/12/writing-an-inbound-email-service-for-salesforce-com/

Thursday, May 5, 2011

Calling Web Services from a Trigger in Salesforce

Please go through the below example for that
we have and object Rndcenter which have two filed tempratureinC,tempratureinF.
When we entered any new record in to this object, user entered firstvalue(tempratureinC) and whith the help of trigger and webservice we got the second value(tempratureinF) and undate the recodes over the object.

Now i am going to drill down the concepts in steps:-
Step 1: Create a object RndCenter
Step 2: Consume WebService
web service information

http://www.w3schools.com/webservices/tempconvert.asmx
http://www.w3schools.com/webservices/tempconvert.asmx?WSDL
and create a class over the sfdc

Step 3: Create Trigger

trigger rnd1 on RndCenter__c (after insert)
{
RndCenter__c rnc=trigger.new[0];
TempConvertWebService.callTempConvertWebService(rnc.id);
}
step 4 :Create a class which call webservice

public class TempConvertWebService
{
@future (callout=true)
public static void callTempConvertWebService(string inputval1)
{
try
{
RndCenter__c rnc=new RndCenter__c();
rnc=[select tempratureinC__C,tempratureinF__c from RndCenter__c where id=: inputval1];
tempuriOrg.TempConvertSoap objtem=new tempuriOrg.TempConvertSoap();
string outtem= objtem.FahrenheitToCelsius(rnc.tempratureinC__C);
rnc.tempratureinF__c=outtem;
update rnc;
}
catch(System.AsyncException e)
{ System.debug( '****Exception' +e ) ;}
}
}

Some time we faced some exception
System.AsyncException: Future method cannot be called from a future method.
Above exception comes due to recursive call of the method(Future),we can resolve this by using a static variable in the class .